the power of light key words: Exposure, iris, aperture, f stops, depth of field, shutter speed & iso
exposure=
the shutter speed controls the amount of lighting reaching your camera's sensor/film (determining how light or dark your pictures are)
iris =
an adjustable aperture which allows you to control how much light you want to allow through the camera lens
aperture =
the opening of the lens where the light passes through
f stops =
the measurement of the aperture for example f/2 or f/16
depth of field=
the area in sharp focus
&
the lower the number the more light reaching your camera
&
what aperture do I use? Often you see a blurred background with the subject sharp in focus achieved by a larger aperture which creates a shallow depth of field
In landscape shots it's important to get both he foreground and background in focus which be achieved by a smaller aperture making a larger area in focus
When you are close to something in the foreground but want to focus on the background use a big aperture
find out more
shutter speed
shutter speed =
the length of time the camera sensor is exposed to light, how long the shutter is open
shutter speed is measured in fractions of a second
such as (1/1000, 1/30, 1/2)
if the shutter is left open for a long time this could over expose the image slow shutter speed & moving subjects = motion blur
if the shutter speed is too quick = dark photo
learn more about shutter speed
iso
ISO =
a feature that will help you capture images in darker environments, brightening a darker image however you should only raise your iso if you are unable to brighten the image through aperture and shutter speed.
too much iso = a lot of grain/noise
watch this video to help you understand iso
white balance
A test for adjusting colour temperature so an image can look more natural/warmer/colder depending on the aim of the scene
Source: snapsapsnap.photos
Colour temperature is measured in Kelvin
lets see it in action:
Source: diyvideoeditor.com
how to do a white balance test:
Find something white like an A4 piece of paper
Photograph it
Go into settings and find White Balance (WB or AWB)
Scroll down to custom/choose WB or colour temperature
Set photo as reference for WB
Canon
Nikon
Source: Digital Photo Mentor
watch these videos on white balance
3 point lighting
soft light =
shadows dissolve
clear definition of shadows
hard light =
SHADOWS:
Creates depth, makes your subject 3D
Size of light source vs size of subject
Lighting object from close = small and soft shadows
Lighting from distance = solid and defined shadows
Sun is perfect hard light as even though it is faraway it gives perfect hard shadow
Silhouette: Window, Iris wide open, depth of field
BACKGROUND:
Dirty background? Use lights to over-expose the background for the appearance of a white background
Bring subject away from background, the further the better
Camera close to subject but further from background creates depth
setting up your lighting: Setting up lights:
Pull all 3 legs out then stretch out till it starts going up
3 points of contact never 4 (the middle)
Lock points
Keep cables under for safety
Packing away lights:
Lock bottom
Bring top up
Watch your fingers!
Wrap cord in loose loop
Back light:
Normally same side as Fill Light
Placed behind subject sometimes off to one side directly behind or overhead
Used to create separation between subject and background so they don’t disappear into it
Adjust until you see a slight halo of light this makes the subject
Key light:
Main source of light
Brightest
Often in front and off to side to create dimension and depth
5 points; nose ears mouth forehead chin
Gives shape
Best to hit both eyes and little bit of cheek
FILL LIGHT:
Opposite side to Key Light
2nd source of light
Usually much dimmer than key light
Used to fill in any shadows created by key
This can be a reflector, balance card, wall anything to balance light on
see it in action:
top tips:
If you only have one source of light use a reflector to fill in and bounce the light
Move away from background
Two lights facing a white wall will create a blinding light, it will over expose the wall which can hide a dirty background
Darker skin works better with harder light
Hair colour changes with lighting
Using natural light? Think about cloudy day can interfere
REFLECTORS: Can be used to fill in for a light or ounce light in a specific direction
HOW TO COLLAPSE A REFLECTOR:
ONE THUMB UP
ONE THUMB DOWN
TWIST
what image are you trying to creatE? EXERCISE: set up two completely different scenes
Crime scene investigation interview
daytime job interview
guide to winter lighting
How to improve your compositions
watch more videos about lighting Three Point Lighting Basics for Photography/Video Key Light, Fill Light, Back Light. What are all these terms? In this video we will walk you through the basics of Three Point Lighting, aka the film/video/photography 101.
More photography basics and articles: https://filtergrade.com/category/photography/
Learn, feel and master cinematic lighting for studio shoots, portraits, and other settings where 3-point lighting is most applicable.
--
Recently added photography videos:
5 Portrait Lighting Positions on Photography Sets https://www.youtube.com/watch?v=d4ChaBrNtOM
Strobe vs Continuous Lighting – Photography Tips https://www.youtube.com/watch?v=pHj7u3m1IE4
3 STYLING TIPS for Striking Portraits https://www.youtube.com/watch?v=-MoY2bZatVs&list=PLke4AY7yuKm9oqYpvDqq0Kcswq8AOtRVj&index=5
Top 5 iPhone Apps for Adding Stickers and Text to Photos https://www.youtube.com/watch?v=_skUMCY2sgY
- - - - - - - - - - - - - - - - - - - -
Follow FilterGrade!
Facebook - https://www.facebook.com/filtergrade
Twitter - https://twitter.com/filtergrade
Pinterest - https://www.pinterest.com/filtergrade/
Instagram - https://www.instagram.com/filtergrade/
Newsletter - https://filtergrade.com/filtergrade-newsletter/
- - - - - - - - - - - - - - - - - - - -
Discover Presets, LUTs, Premiere Pro Templates and more digital products on FilterGrade: https://filtergrade.com/shop/
View more educational content on our platform: https://filtergrade.com/education/
Subscribe so you can see future photography and video production videos first! #photography #lighting #lightingdesign
Let's Talk Film Lighting: The Basics ***Exclusive Discount For The Olufemii Tuts Community:***
⭐️ Learn More About Envato Elements $9 Offer ➡️ https://1.envato.market/PyEQGq
🖥 Unlimited Downloads Of Video Assets ➡️ https://1.envato.market/PyEQGq
*********************************************************
And yes... The "s" is silent in Fresnal... My mistake
In this video I cover 3 elements of lighting:
Color Temperature
Basic Lighting Equipment
And 5 Lighting Rules
Let's Talk Film Lighting: Lighting a Classroom:
http://tinyurl.com/j65hjgl
Purchase awesome light leaks and Premiere Project files at
http://LuxuryLeaks.com
Add me on Instagram: @MadeByOlufemii
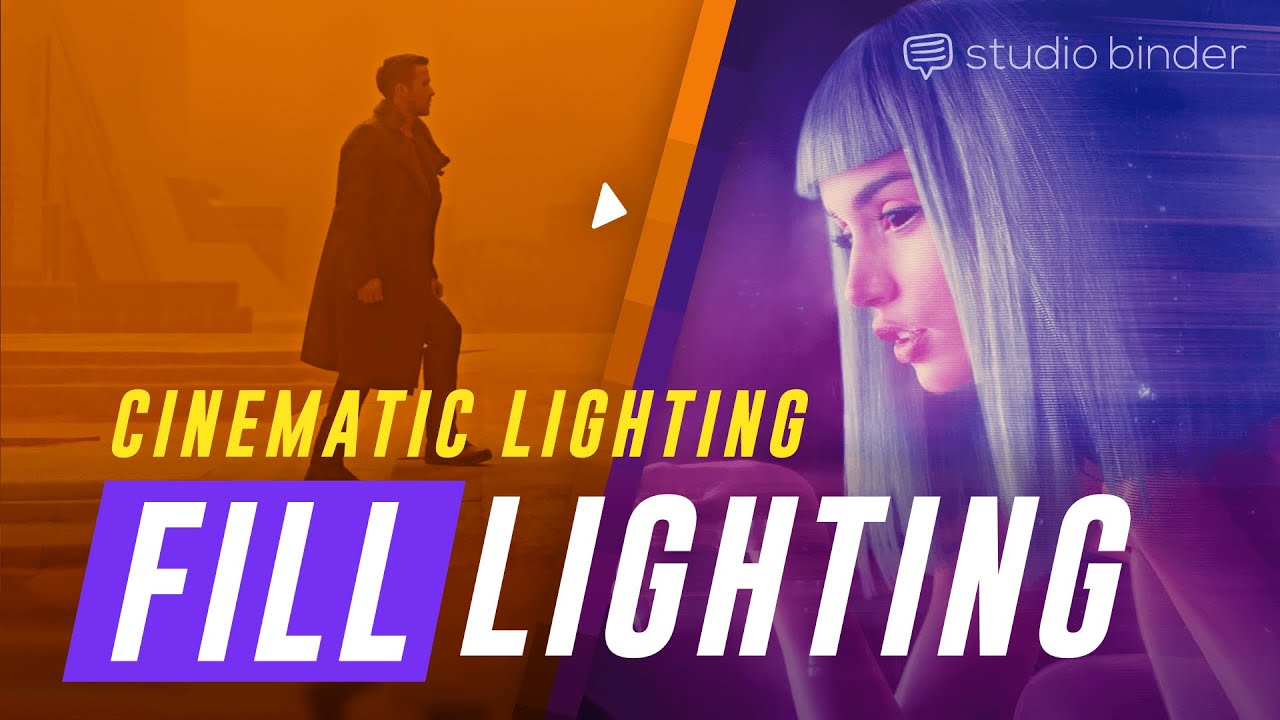
Video Lighting Techniques — Nailing that Cinematic Look (with a Fill Light) More Video Lighting Techniques ►► http://bit.ly/334Jq8v
More Cinematography Techniques, including a FREE Cinematography Checklist ►► http://bit.ly/3cxqK5z
Film lighting techniques can be simple, especially with a simple three-point lighting setup. But that doesn’t mean that you still can’t achieve that cinematic look. Cinematic lighting can be achieved with the 3 main light sources — the key light, the fill light, and the backlight. This combination is used in a large majority of film lighting setups and each light fulfills a function. What we want to explore in this video is just how important the fill light is to the overall look and feel of a shot. Of all three lights, the fill light just might the most important.
Contrast ratio is the relationship between the key light and fill light — in short, more fill light yields a low contrast lighting, while less fill light will achieve more high contrast lighting. Contrast ratio is all about determining the mood of a scene and that’s where the fill light’s purpose becomes so important. So many film lighting techniques revolve around adjusting contrast ratio through raising or lowering the level of the fill light.
Another aspect of film lighting techniques is the placement of each of these lights. In many cases, the key light is placed on the “smart side” of the subject — that is to say on the opposite side of the camera — and the fill light is often pointed at the subject from the same side as the camera (i.e., the “dumb side”). This is not a hard and fast rule in cinematic lighting but it does wonders for creating a layer of depth in the image. For many reasons, you can switch it up (e.g., dumb side key and smart side fill). It just depends on the scene and how you want to capture the moment.
#cinematography #filmmaking #lighting
—
Music by Artlist ► https://utm.io/umJx
Music by MusicBed ► http://bit.ly/2Fnz9Zq
—
SUBSCRIBE to StudioBinder’s YouTube channel! ►► http://bit.ly/2hksYO0
Looking for a project management platform for your filmmaking? StudioBinder is an intuitive project management solution for video creatives; create shooting schedules, breakdowns, production calendars, shot lists, storyboards, call sheets and more.
Try StudioBinder for FREE today: https://studiobinder.com/pricing
— Join us on Social Media! —
Instagram ►► https://www.instagram.com/studiobinder
Facebook ►► https://www.facebook.com/studiobinderapp
Twitter ►► https://www.twitter.com/studiobinder
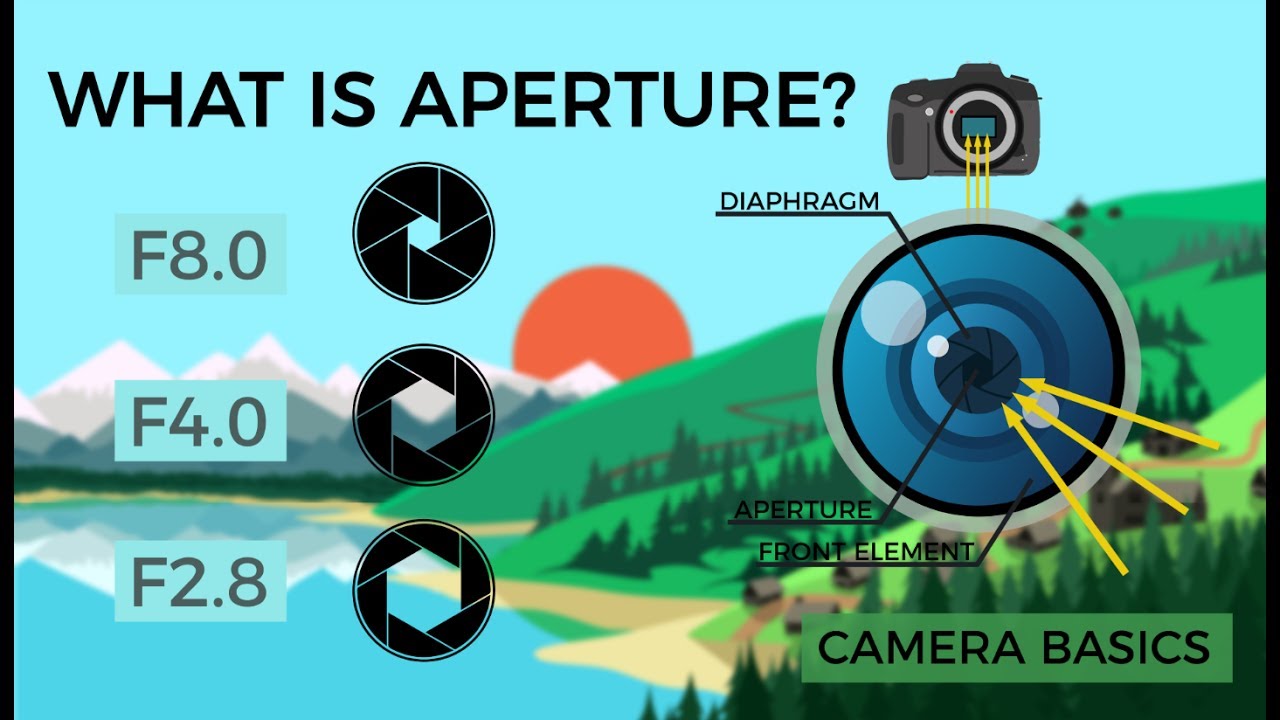
Camera Basics - Aperture Sign up for a free 30-day trial to Sonata with my tracking link: https://sonata.media/?utm_source=affiliate&utm_medium=youtube&utm_campaign=vincentl.
This video was sponsored in part by Sonata. Sonata is a music licensing service designed for creators. Full of professional artists, Sonata contains an endless library of high-quality tracks that is leaps and bounds better than other stock music platforms. Powered by AI and designed with direct input from creators, Sonata's search engine has advanced features making finding the perfect track easy.
Thank you!
In this animation, I explain Aperture and how it interacts with the various parameters of photography.
________________________________________________________________________________________________
I am releasing an animation with a similar style to this one every month, so stay subscribed for more. Feel free to leave criticism in the comments, but keep in mind that I am still learning After Effects and Illustrator. Also, leave suggestions for different video topics. I plan on covering the other two pillars of photography: Shutter Speed, and ISO, as well as Focal Length.
________________________________________________________________________________________________
Credits:
Animation, Vector Design: Vincent Ledvina
Voiceover: contracted from Fiverr
Music: Wonder - Mattia Cupelli
Sound Effects: Created by myself and sourced online
________________________________________________________________________________________________
Thank you for watching!
How to Tell Story With Lighting | 7 Essential Rules Stay tuned to the end for a chance to win our new Amaran F7!
Story, story, story! At the end of the day, story is the most important part of a film. But did you know that there are many ways to use lighting to enhance the depth of your story? In today's episode of Ask Aputure, Ted from the A-Team walks us through 7 creative lighting techniques you can use to help you take your cinematography and storytelling to the next level. These narrative lighting hacks will help you grow as both a filmmaker and storyteller!
Want more free lighting and cinematography tutorials? Subscribe to us so you never miss an episode: https://goo.gl/QwazdM
🎥Hard Lighting Techniques:
https://youtu.be/qokchfzIksU
🎥Soft Lighting Techniques:
https://youtu.be/ru9S0kUlRlc
🎥Subscribe to Aputure:
https://www.youtube.com/aputurephoto
https://www.facebook.com/aputure
https://www.instagram.com/aputuretech
https://www.twitter.com/aputurephoto
🎥Connect with the A-Team!
Ted - https://instagram.com/aputure_ted
Nerris - https://instagram.com/aputure_nerris
Benny - https://instagram.com/aputure_benny
🎥If you enjoyed this video help others enjoy it by adding captions in your native language:
http://www.youtube.com/timedtext_video?v=cjYhdNUIkl8&ref=share
🎥GET APUTURE GEAR:
http://lddy.no/3dkv
🎥LIGHTING DIAGRAMS:
https://www.filmsetobjects.com/
🎥MUSIC:
http://bit.ly/pb_aputure
🎥GRAPHICS:
http://bit.ly/Aputure_RS
Summary:
Ted walks us through seven creative lighting techniques that specifically pertain to enhancing and adding depth to your story/narrative.
Aputure's YouTube channel provides free high quality cinematography, lighting, and filmmaking educational content to help you take your film projects to the next level.
#cinematography #visualstorytelling #narrativelighting
CINEMATIC LIGHTING: Lighting with purpose and story in mind Today we are going to see how positioning your lights differently and even by taking away lights can greatly improve the cinematography of your film. We will also dive in to movies from some of the greatest cinematographers and see what lighting choices they have made.
Interested in getting After Effects CC?
Buy it here: https://goo.gl/eNop8t
Get Amazing Light Overlay FX and help support the channel:
VINTAGE LIGHT FX
https://www.kriscoart.com/vintagelightfx
Last week we took a look at a basic 3 point lighting set up. We went over what a key light is and we took a look at adding layers of separation and balance with a fill light and a back light. If you missed it, check it out here: https://www.youtube.com/watch?v=fg9VBLuzHGI&t=29s
Check out these Post Production assets to help your editing workflows:
HEY check out Stationery & Design Templates HERE: https://bit.ly/2JL2FLk
NEED GRAPHICS?: https://bit.ly/2HkR5p2
GET WEB ELEMENTS HERE: https://bit.ly/38D4Z1K
COOL VFX ELEMENTS: https://goo.gl/WVLgBd
Make it Awesome!
Check out these amazing products that I use all the time:
Envato: https://bit.ly/2SEd6UV
https://bit.ly/2SBrNcR
Production Crate: https://bit.ly/39lsj3V
Smashworks: https://bit.ly/2OHTkGX
Musicbed: https://bit.ly/2OCL1w4
MUSIC BY:
Lude Illa - Joe Bagale
Drums of the Deep - Kevin MacLeod
Comfortable Mystery 4 - Kevin MacLeod
New Land - ALBIS
William Tell Overture - Rossini
Breathe - Glude
Movies featured in this video:
Sicario (2015)
Se7en (1995)
Fight Club (1999)
The Godfather (1975)
Subscribe to my Second Channel and check it out!
https://www.youtube.com/krisatruini
⬇ MY GEAR ⬇
Sony a7s https://goo.gl/VSPhm9
Sony a7s II https://goo.gl/zxlsFk
Sony 24-70mm https://goo.gl/HqZeYQ
Sony 55mm https://goo.gl/yIDfFn
Tamron 70-200mm https://goo.gl/b5eGnD
Tamron 15-30mm https://goo.gl/tZCYyB
Edited in Premiere CC
INSTAGRAM: http://instagram.com/kriscoart
TWITTER: https://twitter.com/kriscoart
FACEBOOK: www.facebook.com/kriscoart
Kriscoart is a filmmaking channel and company based on the core values to Learn, Create, Share. The editing and VFX tutorials, lighting workshops, and short film break downs are a small step towards free education hoping that one day this can be an integral part in providing the tools and knowledge so that every filmmaker’s voice and unique perspective is heard.
If you are interested in learning tips and cinematic camera techniques and giving an epic flare to your edits while staying true to the emotion of the story then Subscribe for more films, tutorials and filmmaking videos.
For business inquiries please contact me here:
create@kriscoart.com
Thank you for watching!
How to Light the Cinematic Film Look Stay tuned to the end for a chance to win an F7!
We've all asked the question "how do I make my footage look more cinematic?" While there are plenty of in-camera techniques you can do like shoot at 24 frames per second or shoot with a shall depth of field, what's even more important is your lighting.
In today's episode of Ask Aputure, Ted from the A-Team will walk us through eight creative lighting techniques you can use to make your footage look more cinematic.
These cinematic techniques are used both in large budget feature films and by independent filmmakers as well. Try utilizing some of these techniques to take your cinematography to the next level, and finally get that cinematic look!
Want more free lighting and cinematography tutorials? Subscribe to us so you never miss an episode: https://goo.gl/QwazdM
🎥How to tell a story with lighting:
https://www.youtube.com/watch?v=cjYhdNUIkl8&
🎥Free Cinematography Lessons From Experts!
https://www.youtube.com/playlist?list=PLjnBD0tWOQ1-jsuV5e_jlOvtjr3nY7S9a
🎥Subscribe to Aputure:
https://www.youtube.com/aputurephoto
https://www.facebook.com/aputure
https://www.instagram.com/aputuretech
https://www.twitter.com/aputuretech
🎥Connect with the A-Team!
Ted - https://instagram.com/aputure_ted
Nerris - https://instagram.com/aputure_nerris
Benny - https://instagram.com/aputure_benny
🎥GET APUTURE GEAR:
http://lddy.no/3dkv
🎥LIGHTING DIAGRAMS:
https://www.filmsetobjects.com/
🎥MUSIC:
http://bit.ly/pb_aputure
🎥GRAPHICS:
http://bit.ly/Aputure_RS
Summary:
Ted Sim teaches us about filmic and cinematic lighting techniques used by filmmakers and cinematographers in the world of Hollywood, independent films, and commercials. Aputure's YouTube channel provides free high quality cinematography, lighting, and filmmaking educational content to help you take your film projects to the next level.
#cinematography #filmiclook #hollywoodlook
How Roger Deakins Creates Cinematic Depth While film and photography are inherently flat, these tips can help add cinematic depth to your shots and make your images look more three-dimensional. This one technique is used in many dramatic Hollywood and television productions. Roger Deakins is probably the biggest master of using it. What is it?
In today's episode of Ask Aputure, Nerris from the A-Team walks us through different ways we can embrace shadows to create cinematic depth and enhance the dramatic look of our images. These tips will turn your flat 2D images into a 3D image!
Stay tuned to the end for a chance to win a prize!
Want more free lighting and cinematography tutorials? Subscribe to us so you never miss an episode: https://goo.gl/QwazdM
🎥How to Light the Cinematic Film Look!
https://youtu.be/oy2wGhuVqoY
🎥Free Cinematography Lessons From Experts!
https://www.youtube.com/playlist?list=PLjnBD0tWOQ1-jsuV5e_jlOvtjr3nY7S9a
🎥Subscribe to Aputure:
https://www.youtube.com/aputurephoto
https://www.facebook.com/aputure
https://www.instagram.com/aputuretech
https://www.twitter.com/aputuretech
🎥Connect with the A-Team!
Ted - https://instagram.com/aputure_ted
Nerris - https://instagram.com/aputure_nerris
Benny - https://instagram.com/aputure_benny
🎥GET APUTURE GEAR:
http://lddy.no/3dkv
🎥MUSIC:
http://bit.ly/pb_aputure
🎥GRAPHICS:
http://bit.ly/Aputure_RS
Summary:
Filmmaker Nerris Nassiri walks us through how to use shadows to create cinematic depth and make our images look more cinematic. Aputure's YouTube channel provides free high quality cinematography, lighting, and filmmaking educational content to help you take your film projects to the next level.